


I like to grow vegetables all year round, and I couldn't afford the big gas bulbs, or the power to run them. The big gas bulbs:
- can explode
- can burn you and your plants
- cost upwards of $50 a month to operate
- raise the temperature in your home, causing the air conditioning to run more frequently
- waste 60% of the light emitted
This prompted me to wire up some compact fluorescent light bulbs (CFLs) in a row and give it a shot. It worked so well I had to share. For the last 10 years I have been doing this in various spaces wherever I live. It's VERY simple to set up yourself.
Parts
Here is a list of parts used (not in quantity as your needs will vary):
- Closet light fixture(s) with or without a pull chain—plastic or ceramic
- Wood, plastic, or metal fixture mount(s) - This goes between the light fixture and the ceiling
- Extension cord(s) of appropriate length or a 2 prong lamp cord with a male end only
- Light bulb socket doubler/splitter(s) - A "Y" shaped socket adapter to make one light socket into two
- 23-27 watt use x 100 watt output CFL bulbs in the appropriate color temperature for your plants/seasons
- Vacation lamp timer/light timer(s) - I recommend digital with battery backup
- A fan of some sort
Warning
- If you have no practice or experience with electrical wiring, you probably shouldn't attempt this.
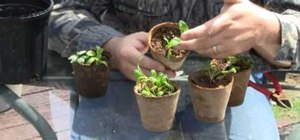
Step 1 Plan it out.
Figure out how many plants you want to grow, and where you want to grow them. I recommend having at least 2' wide x 2' wide x 3' high as the smallest space.
There should be a minimum of two 100 watt output CFLs in any growing space. I typically use 6 or more bulbs in a room that is 2' by 3' by 3' high, and grow 6 to 10 plants in it.
You will want to space the bulbs evenly along a center line on the ceiling from side to side. Figure out the layout, and make sure you have enough wire to run through all of the bases you use, and all the way to your plug. Make sure it will have slack, and not be too tight.
Step 2 Wire the bases.
Wire the bases in succession from the female or clipped end of the cord toward the male or wall plug end. Make sure you use the positive wire on the positive post of each base, and negative on the negative post.
For this operation, I separate the wires from each other, and use an ice pick, or awl to make a hole through one wire at a time, and then screw through my holes into the bases. This eliminates any cutting, or splicing, and is MUCH safer. The idea is to pierce through the jacket, through the center of the wires, and out the other side of the jacket without corrupting the sides of the jacket.
Step 3 Mount the boxes.
Mounting Method A:
- Place the mounting boxes on the ceiling lined up with the bases.
- Attach the bases to the mounting boxes. (Some mounting boxes have knock-outs, and you have to run the wires through them as you go. They will need to be attached to the ceiling prior to wiring the bases.)
Mounting Method B:
- Get 2 pieces of wood exactly the same as each other. Ideal dimensions are 3/4" x 3/4" by desired length.
- Attach the bases to the wood at the appropriate places, and then flip it over.
- Screw the wood pieces to the ceiling.
Warnings
- This way can be considered dangerous because of the risk of sparks igniting the wood, so this method is not recommended. (Having said that, I prefer this method for my own endeavors. I am very good at wiring, and there is no chance my work will spark a fire.)
- Seriously, if you are not very good at wiring, don't use this method. It may violate certain codes in some cities, too.
Step 4 Plug things in.
The hard part is over. Now you just put your splitters and bulbs in the bases. Plug the light cord into the timer, and plug the timer into the wall outlet.
Step 5 Set the timer.
Find out how many hours of light your desired plants need, and set the timer accordingly.
Step 6 Plug a fan in.
Plug in a fan that will blow on the plants. Oscillating fans work well. The idea is to make the branches blow in the wind, so they will strengthen themselves, just like outside. The fan will automatically disperse any small amounts of heat CFLs generate in its operation. The same can be said in reverse; the fan that you use to cool the lights will strengthen the branches.
If you have a room with a closing door, you will need an inlet, and outlet for air flow, and an exhaust type fan, or CPU cooling fan in the outlet hole. The air should come in near the bottom, and exit near the top. The inlet hole can have a filter of some sort to keep out bugs, but don't choke your fan.
Tips
- I prefer to grow in soil, and use water soluble fertilizers.
- Keep the plant canopies (tops) 1 to 3 inches from the bulbs. During plant stretching, you may want to increase this distance, or your plant may grow into the light when you're not paying attention. Good news is, CFLs won't burn up your plants. There may be slight burning/drying at the point of contact, but nothing serious.
- Turn/rotate plants 1/4 turn each day to give all sides equal access to the light.
- Watch the videos below for the process and results of my hard work.
I moved the plants outside in spring, and we moved to a new place in the summer. There is no current indoor garden here, as the house is tiny, and has no extra closet space. I will need to make myself a grow room if I want to do this in the new house. It's just a matter of time. Running my own business keeps me very busy.
Just updated your iPhone? You'll find new emoji, enhanced security, podcast transcripts, Apple Cash virtual numbers, and other useful features. There are even new additions hidden within Safari. Find out what's new and changed on your iPhone with the iOS 17.4 update.


9 Comments
The fan will act out pollination, so there is no need to import bees, or other pollenating insects.
There are some plants that wind cannot assist with pollenation. For these plants you will need a small paintbrush. Very small, like an artist's detail paintbrush, or nail polish applicator. A long handle helps.
You can also do selective breeding with the paint brush. Pick your two specimens, and collect pollen from one, and paint it on the pistils of the other. Make a label from a twist tie and a piece of paper, that indicates which flower, or plant is the other parent, and hang it on the pollenated flower.
awesome, man. i've been stuck with the idea that it was HPS for flowering, Metal Halides for veg, or t5 fluorescent. super, super cool.
One reason they switch out the lights is for seasonal light variances. The sun makes more of a blue light in the spring and early summer, but it changes to a more yellow hue, and becomes slightly more intense in the late summer/ early fall. I use a 2,700K bulb for fall, and 6,500K for spring and summer. At the end of the fall season, some people will add a 6,500K bulb, or switch one 2,700 out for a 6,500. I have found this unnecessary. I do use one or two more bulbs, and move the plants closer to the lights in the fall season to increase the intensity.
I frequently leave annuals in one room or another for years. I had one pepper plant for over 3 years, and then I moved it outside when it got bugs, where it lasted the entire growing season. It died with the rest of my outside annuals when the snow came.
Temperature plays an important role in the ability of certain plants to reproduce. Tomatoes are a good example. I can grow dwarfs, and every cherry tomato I have ever tried in the normal 70-80 degree range of my rooms. I had trouble with beefsteak, and jubilee. They would not hold blossoms unless the temperature rose above 87 for several days. This caused problems for other plants in the same room, so I decided to scrap those. I later read that they need heat, so it just backed up my experience.
I was REALLY looking for an article like this one, thanks a lot for sharing!
This was the article I was looking for whole of these three months!!!i don't have a lawn neither balcony,,only a very low shade two windows and a big heart to do plant growth,,,tried out different ways,,,now let me try out in this way!! How about doing it hydroponically and aquaponically,,,will it work???
Share Your Thoughts